Chair         Open Producer - Tutorial

Contents

What is Open Producer?
Sorting Out the Terminology
Camera
Lens
RenderSurface
CameraGroup
CameraConfig
KeyboardMouse
InputArea
Learning By Example
RenderSurface
Camera


This section will introduce the concepts and motivations behind Open Producer and introduce the components at a high level.  It explains how to use Open Producer in your 3D Graphics, OpenGL applications.  Open Producer is built on OpenGL and depends upon it.  If you are familiar with OpenGL, many of the concepts will be familiar.

What is Open Producer?

When OpenGL was first designed, a decision was made to keep the focus of the library on  3D rendering.  To support this decision, the Application Programming Interface (API) was kept windowing system neutral.  That is to say, that no interface was designed within OpenGL for the creation and management of windowing system components such as windows, "widgets", or input events.  The positive aspect of this decision was that the library focused on 3D rendering.  The negative aspect was that the programmer was left to come up with his own set of programming libraries or routines to create a window, a graphics context for OpenGL and manage windowing and user input events.  Consequently, many auxiliary libraries were written to facilitate this task for the programmer.  Probably the most popular for its portability and simplicity is GLUT, written by Mark Kilgard.

Windowing systems, by design, are user interfaces.  The whole concept of a window, a cursor, user generated events by keyboard and mouse, and graphical representations of buttons and sliders, and various other types of "widgets", supports the notion that action begins upon user input.  The application waits until the user has indicated some desired action, at which point it reacts and computes, but always returns to a resting state, once again waiting for user input.

Most toolkits provided to 3D graphics programmers are based upon the windowing system paradigm.  The common structure is to create a window, a graphics context, callbacks to handle user input and window configuration events, and, then, at some point, the programmer relinquishes control of the main loop to the toolkit.  Among the callbacks specified is one that can render the 3D graphics.  It may be called after some user input, or continuously if and when the main loop is idle, or based upon some timing event.

Applications residing within this context may be referred to as being interactive.  The user expectation is that the application will respond in a timely manner to his input requests, and need not be active when the user is not providing input.

However, another classification exists for 3D graphics applications, which require reliably constant and continuous update rates.  These applications strive to emulate the real visual world and must, therefore, update at solid frame rates higher than the human eye can distinguish between discreet frames and continuous motion.  These applications can be referred to as real-time graphics applications.  Examples of real-time applications are flight (or any other motion) simulators, virutual reality, video games.

The problem that Open Producer attempts to solve then, is the provision of methods for creating graphics rendering contexts for real-time applications.  Toolkits that are built in the windowing system paradigm fall short of the needs of real-time graphics programmers, forcing them to write their own methods or causing them to attempt to live within the constraints of the graphical user interface paradigm.

Open Producer borrows concepts from the movie industry, because the mechanics of achieving the goals of a real-time programmer and a movie producer are quite similar.  They differ only in the abstract.  Open Producer builds upon the analogy of a camera, by providing the components of a camera, and the methods for manipulating a camera.

A movie camera has a constant, solid frame rate.  It has a rendering surface where the image from the real world, after having passed through the lens is captured or rendered, one frame at a time.  It provides the camera man with the ability to change the field of view.  It provides configurability for different qualities of film or rendering surfaces.  A movie camera does not have a keyboard or a mouse.

Open Producer takes the concept a bit further in the software abstract than the real camera can, however, providing methods for building assymetrical viewing frustums, orthographic projections and rendering to a projection rectangle within the rendering surface.  Further, Open Producer provides the concept of a Camera Group to facilitate the synchronization of multiple cameras together.  In the world of real-time 3D graphics this is sometimes referred to as "multi-pipe rendering".

It is important to note here that Open Producer is not implemented to the exclusion of interactive programs.  On the contrary, it can reside within the constructs of graphical user interfaces.  To this end, Open Producer has some user interface provisions such as a KeyboardMouse class.  One desirable feature of KeyboardMouse is that it tracks user input seamlessly across multiple windows, known as an InputArea.  It is also important to note that Open Producer is not designed to be a user interface.  How this is reconciled will be covered in future sections.

Sorting Out the Terminology

Producer::Camera diagram
Figure 1-Open Producer Camera diagram

Figure 1 shows a diagram of the abstract Open Producer camera.  To explain the components and how they relate to OpenGL, consider the process of rendering a 3D scene in OpenGL.  The world is defined in three-dimensional cartesian coordinates.  Objects are defined in model space and moved into the scene by transforming them through the modelview matrix.  A complete scene is rendered and multiplied against a Projection Matrix, which projects the three dimensional world to a 2 dimensional screen.  In the process, it can only render that which resides inside the viewing frustum, which is defined by the internal values of the Projection Matrix.

The OpenProducer Camera's Lens generates the OpenGL Projection Matrix.  The scene is projected to a projection rectangle on the Open Producer Camera's RenderSurface.  The Camera itself can have the attributes position and attitude, which place it somewhere in the world.  However, the Open Producer Camera does not have the ability to define the scene.  It provides a Scene Handler, which the programmer can use to define the 3D scene.

Let's review these terms and apply some more formalized definitions of them.

Camera

A Camera is the object that captures a scene, one frame at a time at some fixed frame rate.  The camera has the immediate attributes position and attitude, which define its position in the 3 dimensional world and the attitude of the direction it is pointing.  A Camera may also have an offset from its position and attitude, which may include a shear for assymetrcal viewing frustums.  A Camera HAS a Lens, and a RenderSurface.

For a complete description of the Camera interface click here.

Lens

A Lens is the  object that defines the projection parameters for projecting a 3 dimensional world to a 2 dimensional rectangle.
Internally it is a projection matrix, which may be set directly, or through some convenience methods.  

RenderSurface

A RenderSurface is the object that defines the buffer where the scene will be rendered.  At first glance it might seem appropriate to call a RenderSurface a synonym to a windowing system Window.  However, a RenderSurface differs from a window by providing components that are of interest to the 3D graphics programmer, such as quality of pixel formats.  It also handles configuration events internally such that the programmer need not track or manage these events in case the window is resized, moved, iconified, or changed externally.  The size of the RenderSurface may be queried at any time.

For a complete description of Producer::RenderSurface interface click here.

CameraGroup

A Camera Group is, as the name implies, a group of Cameras that are synchronized together such that they begin their frames at the same time and end redering at the same time.  Some of the methods CameraGroup provides are the same as the methods within Camera, but when called the method is applied across all Cameras in the Camera Group.  Camera Group provides cohesion to multiple cameras that are intended to be synchronized views into a 3D world.

CameraConfig

A CameraConfig is a class describing a configuration for a CameraGroup.  It may be explicitely configured through an API, or configured through a configuration file.  The details of the configuration file are specified in a the documentation for CameraConfig.

KeyboardMouse

The KeyboardMouse class is an object that provides the programmer with a way to get Keyboard and Mouse events through a Callback class, rather than a callback method.  It can take keyboard and mouse events from a single window, or multiple windows known as an InputArea.  

InputArea

An InputArea is a configuration of InputRectangles which, when composited, describe an area of input for mouse and keyboard events.  Key presses and releases will be delivered in the normal way.  Mouse events will describe the position of the pointer in the coordinate space described in each or the list of InputRectangles  of the InputArea.

Learning by Example

What follows is a tutorial, which teaches how to use Open Producer through source code examples.  It will be assumed that the reader has a good working knowledge of C++ and standard programming practices.  Open Producer is intended to be easy to use, but can also be quite powerful.  The tutorial will focus on the simple uses, then provide some examples for advanced use.

The code examples are distributed with the Open Producer source, with cross-platform build environments.  The reader is encouraged to compile, modify and recompile these examples for a hands-on training experience.  

It is best to take the examples in the order that they are given as often later examples will build upon lessons learned in the earlier examples.

RenderSurface

The first example provides the means for creating a surface for 3D rendering.  In this example, a small C++ class called MyGraphics will provide a simple mechanism for initializing some OpenGL state and using OpenGL to render the famous OpenGL teapot.


//C++ source file - Open Producer - Copyright (C) 2002 Don Burns
//Distributed under the terms of the GNU LIBRARY GENERAL PUBLIC LICENSE (LGPL)
//as published by the Free Software Foundation.

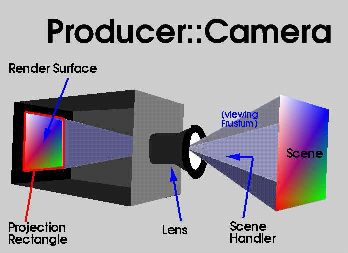
// Simple example of use of Producer::RenderSurface
// The MyGraphics class is a simple sample of how one would implement
// graphics drawing with Producer::RenderSurface

#include <Producer/RenderSurface>
#include "MyGraphics"

int main(int argc, char **argv )
{
    // Declare a RenderSurface
    Producer::RenderSurface rs;

    // Optional.  Set the window size.
    // Arguments are x, y, width, height
    // If this call is not made, the RenderSurface
    // will occupy the entire screen with no border
    rs.setWindowRect( 100, 100, 640, 480 );
    // Give the window a name in the border
    rs.setWindowName( "Producer Example using Render Surface" );

    // required.  This creates the window and
    // sets up the graphics context.

    rs.realize();

    // Add your own rendering code.
    MyGraphics gfx(rs);
    gfx.init();

    while( true )
    {
        // If possible, RenderSurface will synchronize
        // the application run-time to the vertical
        // retrace signal
        rs.sync();

        // Call your own draw routine
        gfx.draw();

        // Swap Buffers
        rs.swapBuffers();
    }
    return 0;
}

Code example 1 - Simple Render Surface

Explanation of the code


#include <Producer/RenderSurface>

#include "MyGraphics"


Note that Producer uses the convention of standard C++ by omitting the suffix of the header files.  Producer/RenderSurface is the include file for the RenderSurface class.  MyGraphics is a local class that is simply used for example.  It has little bearing on the functionality of RenderSurface although it does access the width() and height() methods of RenderSurface for determining the width and height of the window.   Two methods in MyGraphics are called in the example, init() which initializes graphics state and draw() which draws the famous OpenGL teapot.

int main(int argc, char **argv )
{
    // Declare a RenderSurface
    Producer::RenderSurface rs;

RendersSurface, like all Open Producer classes is namespace protected by the Producer namespace.  Classess are allowed to be declared on the stack as demonstrated in this example, but the usual care should be taken when doing this.

// Optional.  Set the window size
// Arguments are x, y, width, height
// If this call is not made, the RenderSurface
// will occupy the entire screen with no border
rs.setWindowRect( 100, 100, 640, 480 );

// Give the window a name in the border
rs.setWindowName( "Producer Example using Render Surface" );


Two optional methods of RenderSurface are invoked here.  setWindowRect() provides the screen x, y coordinates of the lower left corner of the window and its width and height respectively.  setWindowName() provides the window with a name which will be displayed in the border.  As the comments indicate, if setWindowRect() is not called, the window will occupy the entire screen, as as a borderless window.  
// required.  This creates the window and
// sets up the graphics context.
rs.realize();


The realize() method creates the window and sets up the OpenGL graphics rendering context.  It is important to make this call before any calls are made to OpenGL as there will be no valid context before this.  However, much of the configuration of the RenderSurface is only available before it is realized.  Once realized certain configuration parameters (such as buffer quality attributes) are not configurable.  A complete list of which methods are meaningful before realization and are ignored after realization is given in the reference page.
// Add your own rendering code.
MyGraphics gfx(rs);
gfx.init();

This is code that is added by the user for graphics rendering and is here for example.

while( true )
{
// If possible, RenderSurface will synchronize
// the application run-time to the vertical
// retrace signal
rs.sync();

// Call your own draw routine
gfx.draw();

// Swap Buffers
rs.swapBuffers();
}

Note the very important point that the control of the main loop is given to the programmer.  There is no "mainLoop()" method in Producer, where the programmer must relinquish control over the run time and wait for the system to call his callbacks.  It is therefore up to the programmer to provide the main loop.

The loop begins with a synchronization (rs.sync()).  Some implementations will provide a method of synchronizing the application with the vertical retrace signal of the graphics subsystem.  The advantages of doing this in a real-time application are discussed in a separate section.  This is, however, optional and may be left out.  Without it, the application will race ahead of the graphics and will be throttled only by a very low level FIFO.  See "Synchronizing your Application to the Graphics Subsystem".

The user's implementation of graphics rendering occurs in gfx.draw().  

All rendering in Producer will assume double frame buffers.  The call to swapBuffers will delimit the end of the graphics frame as far as the application is concerned.

Camera

The RenderSurface example demonstrated the usage of Producer in its simplest for, providing the 3D application with a rendering surface.  In that example, the programmer is expected to provide his own methods drawing as well as initializing and updating the OpenGL Projection Matrix and Modelview Matrix.  In this example, we introduce the Producer Camera class, which is designed to abstract these matrices into a camera object.  The Producer Camera class, handles the setting up of the Projection matrix through a Lens interface, the positioning of the camera in 3D space through its setView() method, and frame by frame control by the frame() method.

The Camera class' scope of responsibility ends with describing the scene it is capturing.  As our real world model of a camera does not  actually generate the light or the objects the light is illuminating, neither does the Producer Camera class have methods for drawing a scene.  The application must therefore provide an implementation of a SceneHandler class derived from the pure virtual class Producer::Camera::SceneHandler.  The Scene Handler is discussed in subsequent paragraphs.

The Camera class has a set of defaults.  The first example demonstrates the use of the Camera in its simplest form, but just using the defaults.


//C++ source file - Open Producer - Copyright (C) 2002 Don Burns
//Distributed under the terms of the GNU LIBRARY GENERAL PUBLIC LICENSE (LGPL)
//as published by the Free Software Foundation.

// Simple example of use of Producer::Camera
// The MySceneHandler class is a simple sample of a Camera::SceneHandler

#include <Producer/Camera>
#include "MySceneHandler"

int main()
{
    // Declare the camera
    Producer::Camera camera;

    // Optional.  Configure the size of the camera's render
    // surface.  Without these lines, the RenderSurface would
    // fill the whole screen and have no border
    Producer::RenderSurface *rs = camera.getRenderSurface();
    rs->setWindowRect( 100, 100, 640, 480 );
    rs->setWindowName( "Producer Example using Camera" );

    // Tell the camera about the Scene Handler.  See notes in MySceneHandler
    camera.setSceneHandler( new MySceneHandler );

    while( true )
    {
        camera.frame();
    }
    return 0;
}


Code example 2 - Simple Camera

The first thing to note is that the code snipet is a bit smaller than the RenderSurface example.  In fact, if the user's goal to use the entire screen and not set a window rectantle by accessing the Camera's RenderSurface, then the code in main() would only have four significant lines.  The real item to focus  on in this example is something called the SceneHandler.  We'll go into detail as to what this is and how it works in the succeeding paragraphs, but first lets take a look at the first few lines of code.


int main()

{
    // Declare the camera
    Producer::Camera camera;

    Producer::RenderSurface *rs = camera.getRenderSurface();
    rs->setWindowRect( 100, 100, 640, 480 );
    rs->setWindowName( "Producer Example using Camera" );


When a Camera is declared, it already contains its default components and one of them is a RenderSurface.  You may assign a RenderSurface to the camera (with setRenderSurface() ) if  you wish, but getRenderSurface() will return a pointer to the default RenderSurface.  In the code here, the RenderSurface is not yet realized so all configuration methods may be called.  The RenderSurface gets automatically realized on the first call to Camera::frame().  

Note that Cameras may only have one RenderSurface.  However, and contrary to our analogy, multiple Cameras may use one RenderSurface.  Each camera must define its ProjectionRectangle within the RenderSurface.  For OpenGL programmers, this is similar to using multiple glViewport1()'s in one Window.


camera.setSceneHandler( new MySceneHandler );   
while( true )
camera.frame();

The distribution has an implementation of a Camera::SceneHandler and is useful for a simple example.  But lets look at what a SceneHandler is and how it functions.  From the class definition file for Camera, Scene Handler is described as follows.


class SceneHandler {
public :
SceneHandler() {}
virtual ~SceneHandler() {}
virtual void frame( Camera &) {}
virtual void cull( Camera &) {}
virtual void draw( Camera &) = 0;
virtual bool useAutoView() { return true; }
};

It should first be noted that a Camera requires a SceneHandler to function properly.  A SceneHandler is to a Producer::Camera as light is to a physical movie camera.  In other words, the SceneHandler is what describes and renders the scene.  The Camera is there to simply capture that scene.  Camera's do not draw scenes, but rely on the programmer to provide the method for drawing a scene.  This aspect makes Open Producer flexible to be used in many different rendering environments.  The programmer may choose to simply write straight OpenGL code, use a game engine or use a Scene Graph such as Open Scene Graph to get the job done.  If you call Camera::frame() and no SceneHandler has been specified, it will result in an error message.

With this design in mind, you can see that the SceneHandler class is defined as a pure vitual class and the implementation of the draw() method is left to the user.  In fact, the example program only defines the draw() method, and all other methods are left to the default methods.  So, you must derive your own SceneHandler class and at least provide a draw() method.

For the explanation of the SceneHandler methods it helps to understand what Camera::frame() does.  The following roughly describes these steps in pseudo code.


  • if scenehandler->frame() returns true, return;
  • call scenehandler->cull();
  • make the RenderSurface's graphics context current
  • If scenehandler->useAutoView() returns true, apply the lens, and apply the position and attitude matrix.
  • call scenehandler->draw();
  • swap the RenderSurface buffers unless it was specifically requested not to.

If your defined SceneHandler chooses to override everything the Camera does in Camera::frame(), you may define frame() in your derived SceneHandler, returning true.  In your frame() method, you must clear the screen, set up the OpenGL PROJECTION matrix, the OpenGL MODELVIEW matrix, draw your scene and swap buffers.  Note that a reference to Camera is passed to frame(), giving you access to its components, including the RenderSurface.

But, it makes better sense to allow Camera to do its job in Camera::frame() and the SceneHandler to do its job in cull() and draw().  The cull() method provides the SceneHandler the opportunity to do rendering optimizations such as sorting by visibility, transparency and optimized rendering order.  For large scenes, this step is important, but not trivial to implement. The use of a scene graph will greatly simplify this step.  Typical scene graphs will have a cull stage, and use only the PROJECTION matrix as input.  The PROJECTION matrix is available from the Camera::Lens reference passed to cull().

If you implement the useAutoView() method in your derived SceneHandler and return false, then the setting up of the PROJECTION and initial MODELVIEW matricies will be left to the SceneHandler.  If you simply use the default method, however, the Camera will do this for you by either default values, or values you have previously passed to the Camera class to set this up. See the next example for a more throrough handling of Camera values.

In your derived SceneHandler draw() method, draw your scene.  You may want to use draw lists created in your cull() method or some other method of handling the scene optimally.  If your scene handler defined useAutoView() and returned false, then you must set up your PROJECTION and MODELVIEW matricies before rendering the scene, but if not, simply use draw() to focus on drawing the scene.

By default, the Camera::frame() method will swap the RenderSurface buffers at the end of the frame.  This may not be desirable if, for example, you have multiple cameras rendering to the same RenderSurface.  In this case you can override the default boolean value passed in Camera::frame() to false and buffers will not be swapped until you call Camera::advance().  However, in this case it is probably better to use the CameraGroup() class, discussed in the next section.

CameraGroup

The Camera Group class is where the Producer takes a turn from being a simple package for providing 3D applications with a rendering surface, to providing a powerfull capability for managing multiple windows, displays, and clustered systems.  A CameraGroup is, as the name implies, a group of Cameras that can be configured and controlled through a single interface.  Cameras have components that can be shared.